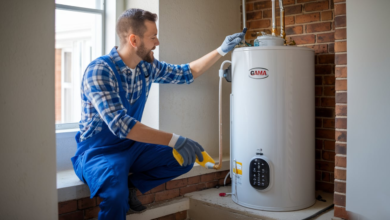
Installing a water heater can seem like a daunting task, but with the right tools and know-how, it can be a manageable DIY project. Whether you’re replacing an old unit or installing a new one, following the correct steps is crucial for a successful installation. This guide will walk you through the process, from selecting the right how to install a water heater to completing the installation and ensuring it’s working properly.
Before You Begin
Before you start the installation process, there are a few things you’ll need to do to prepare:
Gather Your Tools and Materials: You’ll need a variety of tools, including a pipe wrench, adjustable wrench, screwdriver, tubing cutter, and tape measure. You’ll also need materials such as plumber’s tape, pipe joint compound, and flexible water supply lines.
Select the Right Water Heater: Choose a water heater that meets your household’s needs in terms of size, capacity, and fuel type (electric, gas, or propane).
Check Local Codes and Permits: Before installing your water heater, check with your local building department to see if you need a permit and if there are any specific codes you need to follow.
Turn Off Utilities: Turn off the electricity or gas supply to your existing water heater before you begin the installation process.
Step-by-Step Installation Guide
Step 1: Drain the Old Water Heater
If you’re replacing an existing water heater, you’ll need to drain it first:
Turn off the cold water supply to the water heater.
Connect a garden hose to the drain valve at the bottom of the tank.
Run the other end of the hose to a drain or outside.
Open the drain valve and allow the tank to drain completely.
Step 2: Disconnect the Old Water Heater
Once the tank is drained, disconnect the old water heater from the plumbing and electrical or gas supply:
Disconnect the water supply lines using a pipe wrench.
Disconnect the gas line (for gas water heaters) using a pipe wrench and apply pipe joint compound to the threads.
Disconnect the electrical wiring (for electric water heaters) using a screwdriver.
Step 3: Prepare the Installation Area
Prepare the installation area for the new water heater:
Clean the area where the new water heater will be installed.
Ensure there is proper ventilation and clearance around the new water heater.
Step 4: Install the New Water Heater
Follow these steps to install the new water heater:
Position the new water heater in the installation area.
Connect the water supply lines using plumber’s tape.
Connect the gas line (for gas water heaters) using a pipe wrench and apply pipe joint compound to the threads.
Connect the electrical wiring (for electric water heaters) using a screwdriver.
Fill the tank with water and check for leaks.
Step 5: Test the Water Heater
Once the installation is complete, test the water heater to ensure it’s working properly:
Turn on the cold water supply and fill the tank.
Turn on the electricity or gas supply.
Check for leaks around the water heater and the connections.
Adjust the temperature setting on the water heater as needed.
Safety Tips
Always turn off the electricity or gas supply before working on a water heater.
Use caution when draining the old water heater to avoid scalding from hot water.
Follow all manufacturer’s instructions and local building codes.
Conclusion
Installing a water heater can be a challenging but rewarding DIY project. By following the correct steps and taking the necessary safety precautions, you can successfully install a new water heater and ensure a reliable supply of hot water for your household. If you’re unsure about any aspect of the installation process, it’s always best to seek professional help. With the right tools and know-how, you’ll be enjoying hot showers in no time.